Labels

Java (10) Spring (10) Spring MVC (6) Web Services (5) Rest (4) Javascript (3) Nodejs (3) Spring Batch (3) Angular (2) Angular2 (2) Angular6 (2) Expressjs (2) Passportjs (2) SOAP (2) SOAPUI (2) Spring Boot (2) AJAX (1) H2 (1) JQuery (1) JUnit (1) Npm (1) Puppeteer (1) Python (1) RaspberryPi (1) Raspbian (1) SQL (1) SQLite (1) Scripts (1) html (1)

Sunday, July 16, 2017

How to invoke a POST method in a RESTFul Web service with basic authentication

As an example of how to do this I will invoke the restful web service that we built here.

If you want to call a web service from a Java Spring application, the best way to go around the problem is (in my opinion) by creating:


  •  A POJO for the request and a POJO for the response. You could avoid these by working directly with JSON strings but I think this could go wild.
  • A bean that invokes the web service, with the password and user as attributes. This bean will use the previous POJO's to build the invocation to the ws.


Request and Response POJO's


In my example I have a web service that takes an object with the webcam parameters (number of seconds to wait until the webcam detects movement), and a response object with the images obtained by the server.

This will be my request:

\src\main\java\com\hjbello\restfulws\RequestCapture.java

package com.hjbello.restfulws;
import com.fasterxml.jackson.annotation.JsonIgnoreProperties;

@JsonIgnoreProperties(ignoreUnknown = true)
public class RequestCapture {

 private int seconds;

 public RequestCapture(int seconds) {
  super();
  this.seconds = seconds;
 }

 public int getSeconds() {
  return seconds;
 }

 public void setSeconds(int seconds) {
  this.seconds = seconds;
 }

 public RequestCapture() {
  super();
  }
 
}

And this the response:

\src\main\java\com\hjbello\restfulws\CapturedMovement.java

package com.hjbello.restfulws;
import com.fasterxml.jackson.annotation.JsonIgnoreProperties;

import java.util.ArrayList;
import java.util.Date;

@JsonIgnoreProperties(ignoreUnknown = true)

public class CapturedMovement {

 private String dateOfCapture;

 private ArrayList<String> imagesPath;

 private ArrayList<byte[]> imagesBase64;

 public String getDateOfCapture() {
  return dateOfCapture;
 }

 public void setDateOfCapture(String dateOfCapture) {
  this.dateOfCapture = dateOfCapture;
 }

 public ArrayList<byte[]> getImagesBase64() {
  return imagesBase64;
 }

 public void setImagesBase64(ArrayList<byte[]> imagesBase64) {
  this.imagesBase64 = imagesBase64;
 }

 public CapturedMovement(String dateOfCapture, ArrayList<byte[]> imagesBase64) {
  super();
  this.dateOfCapture = dateOfCapture;
  this.imagesBase64 = imagesBase64;
 }

 public CapturedMovement() {
  super();
 }

 public ArrayList<String> getImagesPath() {
  return imagesPath;
 }

 public void setImagesPath(ArrayList<String> imagesPath) {
  this.imagesPath = imagesPath;
 }
 
}


Invoker


Now we create the bean that we will autowire every time we need to invoke the restful web service in our application


\src\main\java\com\hjbello\restfulws\WebcamRestWS.java


package com.hjbello.restfulws;

import org.apache.http.auth.AuthScope;
import org.apache.http.auth.UsernamePasswordCredentials;
import org.apache.http.impl.client.BasicCredentialsProvider;
import org.apache.http.impl.client.DefaultHttpClient;
import org.springframework.http.HttpEntity;
import org.springframework.http.HttpHeaders;
import org.springframework.http.MediaType;
import org.springframework.http.client.ClientHttpRequestFactory;
import org.springframework.http.client.HttpComponentsClientHttpRequestFactory;
import org.springframework.stereotype.Component;
import org.springframework.web.client.RestTemplate;

import com.fasterxml.jackson.core.JsonProcessingException;
import com.fasterxml.jackson.databind.ObjectMapper;

@Component
public class WebcamRestWS {

 private String url = "http://localhost:8080/capture/";
 private String user = "user";
 private String password = "1234";

 
 public CapturedMovement invokeWecamRestWS ( RequestCapture requestCapture) throws JsonProcessingException{
  //First we prepare the authentification
  DefaultHttpClient httpClient = new DefaultHttpClient();
  BasicCredentialsProvider credentialsProvider =  new BasicCredentialsProvider();
  credentialsProvider.setCredentials(AuthScope.ANY, new UsernamePasswordCredentials(user, password));
  httpClient.setCredentialsProvider(credentialsProvider);
  ClientHttpRequestFactory rf = new HttpComponentsClientHttpRequestFactory(httpClient);

  //Here we convert the request to json, and then to httpEntity
  ObjectMapper mapper = new ObjectMapper();
  String requestCaptureJson = mapper.writeValueAsString(requestCapture);
  HttpHeaders headers = new HttpHeaders();
  headers.setContentType(MediaType.APPLICATION_JSON);
  HttpEntity request= new HttpEntity(requestCaptureJson, headers);

  //We invoke the web service
  RestTemplate restTemplate = new RestTemplate(rf);
  CapturedMovement response = restTemplate.postForObject(url,request, CapturedMovement.class);
  return response;
 }

}


Be aware that you will need the following dependencies in your pom.xml file:


  <!-- Restful web services -->
  <dependency>
   <groupId>org.codehaus.jackson</groupId>
   <artifactId>jackson-jaxrs</artifactId>
   <version>1.9.13</version>
  </dependency>
  <dependency>
   <groupId>com.sun.jersey</groupId>
   <artifactId>jersey-client</artifactId>
   <version>1.19</version>
  </dependency>
  <dependency>
   <groupId>org.apache.httpcomponents</groupId>
   <artifactId>httpclient</artifactId>
   </dependency>

If you want to invoke a GET method, instead of restTemplate.postForObject you will need something like


CapturedMovement response = restTemplate.getForObject(url, CapturedMovement.class);

in the Getting Started Spring tutorial you have a complete example regarding GET methods.


Tests with JUnit4


Now that we have our invoker class (or client), we can test it with JUnit4. For that purpose create a src/main/test folder in your classpath and click on New -> JUnit Test Case


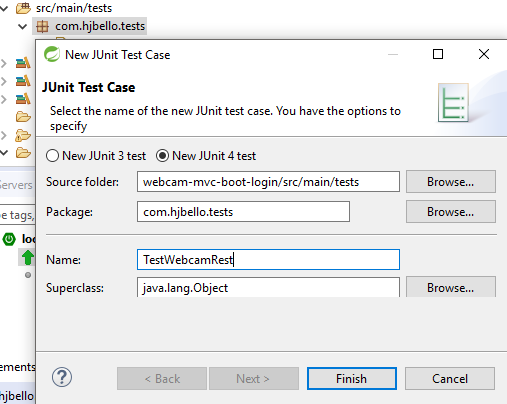
And add the following code to the newly created class


\src\main\tests\com\hjbello\tests\TestWebcamRestWS.java


package com.hjbello.tests;

import static org.junit.Assert.*;
import org.junit.Test;
import com.fasterxml.jackson.core.JsonProcessingException;
import com.hjbello.restfulws.RequestCapture;
import com.hjbello.restfulws.WebcamRestWS;


public class TestWebcamRestWS {

 @Test
 public void test() throws JsonProcessingException {
  WebcamRestWS wr = new WebcamRestWS();
  RequestCapture request = new RequestCapture(1);
  System.out.println("testing web service client");
  System.out.println(wr.invokeWecamRestWS(request));
  assertNotNull("Asserting that return class is not null", wr.invokeWecamRestWS(request));
 }

}


To run it we will click on Run As -> JUnit Test


Or alternatively in Run Configurations:


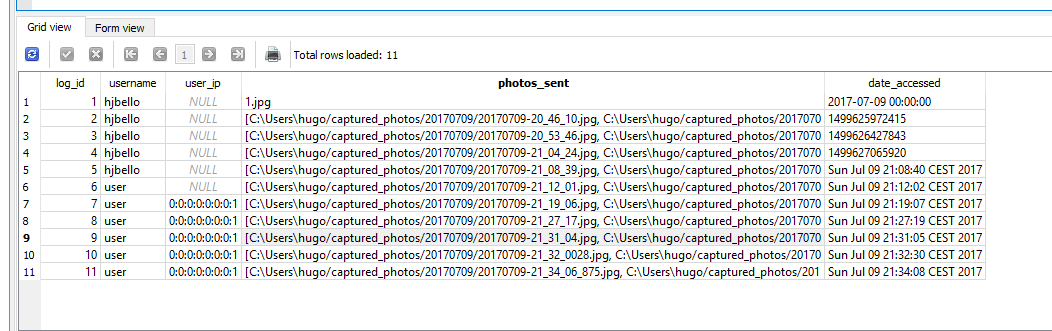
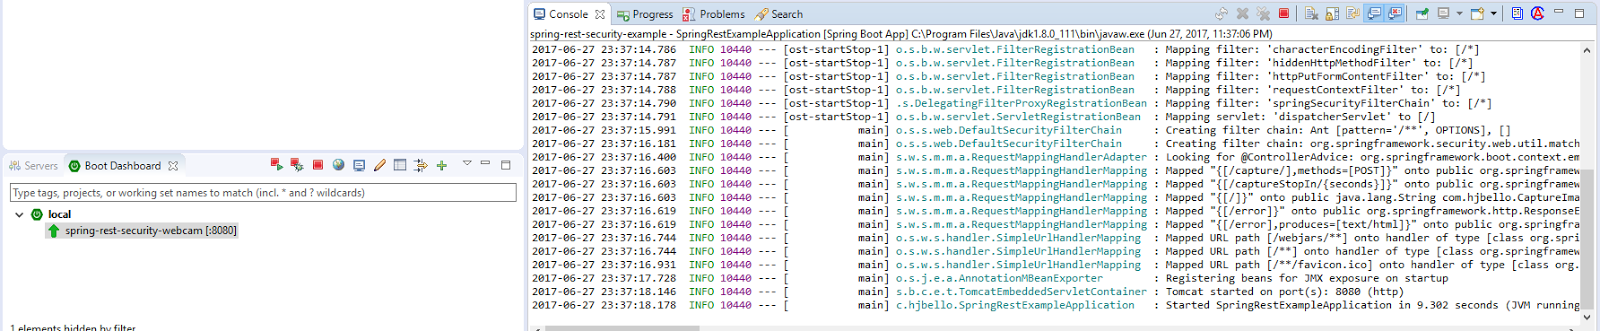
We will see that it Runs OK and it gives us JSON response down in the console:


here you have more info regarding JUnit4.

Tuesday, July 11, 2017

Using SQLite in a Java Spring project with jdbc

Recording the activity of our app using SQLite and jdbc


Let us see how to set up a simple SQLite database and how to insert data in it using jdbc. As an example we will use the restful server that we created in a previous post

So suppose that you have a rest controller and you want to record each request of data into a simple table created in a SQLite database.

Setting up the SQLite database


The first thing you need to know is how SQLite works. The magic of SQLite is that you do not need an actual server to communicate with a SQLite database, you just use a *.db file.

SQLite databases are perfect for environments in which you do not want to communicate with an actual database server but you want the advantages of using queries to store and retrieve data. This technology allows  you to create a *.db file and use jdbc to post and extract data into that file. In case that your application grows bigger you later can replace this setting for an actual connection to a MySQL or Oracle SQL database.


So first you need to create the database. For that I recommend you install a simple SQLite IDE, for instance I have used SQLiteStudio with success in the past.

Once in SQLiteStudio go to Database -> Create database, and choose a name. For instance I called mine activity_log.


Then create a new query and run the following code:


CREATE  TABLE app_activity_log (
  log_id  INTEGER PRIMARY KEY AUTOINCREMENT,
  username VARCHAR(45) not null,
  user_ip VARCHAR(45),
  photos_sent VARCHAR(100),
  date_accessed DATETIME);


This will create the table that we will need. The idea is that every time the user calls the Spring Controller that shots the camera, we will record the user data and the list of photos taken in our table app_ativity_log

Inside your sqlitestudio folder you will find the database that you just created (activity_log.db).


Connect with a SQLite database using spring and jdbc


The right way to connect to any database from a spring application is to create a DAO (data access object), and make it into a spring bean.

In this section we will create the following classes inside our spring app


Before creating the DAO we need a POJO (plain old java object, TAppActivityLog) that imitates the structure of our table app_activity_log:

\src\main\java\com\hjbello\dao\TAppActivityLog.java
package com.hjbello.dao;

import java.util.Date;

public class TAppActivityLog {
 private String username;
 private String userIp;
 private String photosSent;
 private Date dateAccessed;
 
 public TAppActivityLog(String username, String userIp, String photosSent, Date dateAccessed) {
  super();
  this.username = username;
  this.userIp = userIp;
  this.photosSent = photosSent;
  this.dateAccessed = dateAccessed;
 }
 public TAppActivityLog() {
  super();
 }
 public String getUsername() {
  return username;
 }
 public void setUsername(String username) {
  this.username = username;
 }
 public String getUserIp() {
  return userIp;
 }
 public void setUserIp(String userIp) {
  this.userIp = userIp;
 }
 public String getPhotosSent() {
  return photosSent;
 }
 public void setPhotosSent(String photosSent) {
  this.photosSent = photosSent;
 }
 public Date getDateAccessed() {
  return dateAccessed;
 }
 public void setDateAccessed(Date dateAccessed) {
  this.dateAccessed = dateAccessed;
 }

}


Now, since we will use injection of dependencies, we will need an interface for the DAO:

\src\main\java\com\hjbello\dao\RecordActivityDAO.java
package com.hjbello.dao;

import java.sql.Connection;

public interface RecordActivityDAO {
 public Connection connect();
 
 public void save(TAppActivityLog tAppActivityLog);

}


And finally the implementation of the previous interface, which we will declare as a bean using the annotation @Component

\src\main\java\com\hjbello\dao\RecordActivityDAOImpl.java
package com.hjbello.dao;

import java.sql.Connection;
import java.sql.DriverManager;
import java.sql.PreparedStatement;
import java.sql.SQLException;
import org.slf4j.Logger;
import org.slf4j.LoggerFactory;
import org.springframework.stereotype.Component;
 
@Component
public class RecordActivityDAOImpl implements RecordActivityDAO {
 final static Logger logger = LoggerFactory.getLogger(RecordActivityDAOImpl.class);

 public Connection connect() {
  // SQLite connection string
  String dbFile = System.getProperty("user.home") + "/sqlite_databases/activity_log.db";
  String url = "jdbc:sqlite:"+dbFile;
  Connection conn = null;
  try {
   conn = DriverManager.getConnection(url);
   logger.info("Connected to database");
  } catch (SQLException e) {
   logger.info(e.getMessage());
  }
  return conn;
 }

 public  void save(TAppActivityLog tAppActivityLog) {
  String sql = "INSERT INTO app_activity_log (username, user_ip, date_accessed,photos_sent) "
    + "values (?,?,?,?)";

  try (Connection conn = this.connect();
    PreparedStatement pstmt = conn.prepareStatement(sql)) {

   pstmt.setString(1,tAppActivityLog.getUsername());
   pstmt.setString(2,tAppActivityLog.getUserIp());
   pstmt.setString(3,  tAppActivityLog.getDateAccessed().toString());
   pstmt.setString(4,tAppActivityLog.getPhotosSent());
   pstmt.executeUpdate();
   logger.info("Activity recorded");
  } catch (SQLException e) {
   System.out.println(e.getMessage());
  }
 }


}


As you see, in order to connect with the database, we just need to use the usual jdbc statement:

         DriverManager.getConnection(url);


And inside the string url we put the local route to the file activity_log.db. In my case is a little messy because I wanted to use the folder of the active user, for which I needed to add:

        String dbFile = System.getProperty("user.home") + "/sqlite_databases/activity_log.db";
        String url = "jdbc:sqlite:"+dbFile;


instead of just writing 

        String url = "C:/Users/hugo/sqlite_databases/activity_log.db


In that I make it more crossed platform. If you were using a MySQL database you would need an actual url to the server where you have you database.

in the function save you have the insert that we will need. Similar queries would be analogous. As you see is the same jdbc statements as you use for other SQL dialects.

Have in mind that for this to work you will need the SQLite driver inside your buildpath, so if you are using maven you will need the following dependency in your pom.xml file:


  <dependency>
   <groupId>org.xerial</groupId>
   <artifactId>sqlite-jdbc</artifactId>
   <version>3.15.1</version>
  </dependency>


Invoke the DAO

Now inside the spring rest controller I want to invoke the DAO. For that, I will inject it using @Autowired and use it right away with the adequate parsing. I will put here snippets instead of the whole class, If you want the complete code check here.

So we declare the DAO like this


 @Autowired 
 RecordActivityDAOImpl recordActivityDao;

And then


// we record this request in the database
     TAppActivityLog tAppActivityLog = new TAppActivityLog();
     tAppActivityLog.setDateAccessed(new Date());
     tAppActivityLog.setPhotosSent(imagesPath.toString());   
     
     Authentication authentication = SecurityContextHolder.getContext().getAuthentication();
     String username = authentication.getName();
     tAppActivityLog.setUsername(username);
     tAppActivityLog.setUserIp(httpRequest.getRemoteAddr());
     
       recordActivityDao.save(tAppActivityLog);

I obtain the user using the spring context and the ip using the httpRequest, which is an input of our controller.


Check that the data has been stored

If you run a test you can go back to your SQLite IDE and run a simple query:


select * from app_activity_log;


You will see that everything has worked well


Download the full project here


https://github.com/HugoJBello/java-projects-tutorials/tree/master/spring-rest-security-webcam


Tuesday, June 27, 2017

Spring Restful example with Spring Security

Spring Restful example with Spring Security. Capturing images with the webcam.


I am going to describe here how to build a simple rest web service with a post and a get method using Spring. In our example, our application will detect movement and take photos with the webcam when the user orders it. We will use Spring Security for the authentication.

The basic schema of our application will be the following


Configuring Spring Boot and Spring Security

Let's start with CaptureImageConfiguration which will contain the configuration details:

/spring-rest-security-webcam/src/main/java/com/hjbello/CaptureImageConfiguration.java

package com.hjbello;

import org.springframework.beans.factory.annotation.Autowired;
import org.springframework.context.annotation.Bean;
import org.springframework.context.annotation.ComponentScan;
import org.springframework.context.annotation.Configuration;
import org.springframework.http.HttpMethod;
import org.springframework.security.config.annotation.authentication.builders.AuthenticationManagerBuilder;
import org.springframework.security.config.annotation.web.builders.HttpSecurity;
import org.springframework.security.config.annotation.web.builders.WebSecurity;
import org.springframework.security.config.annotation.web.configuration.EnableWebSecurity;
import org.springframework.security.config.annotation.web.configuration.WebSecurityConfigurerAdapter;
import org.springframework.security.config.http.SessionCreationPolicy;
import org.springframework.security.web.authentication.SimpleUrlAuthenticationFailureHandler;
import org.springframework.web.servlet.config.annotation.EnableWebMvc;

import com.hjbello.security.CustomBasicAuthenticationEntryPoint;
 
@Configuration
@EnableWebSecurity
@ComponentScan(basePackages = "com.hjbello")
public class CaptureImageConfiguration extends WebSecurityConfigurerAdapter {

    private static String REALM="MY_TEST_REALM";
     
    @Autowired
    public void configureGlobalSecurity(AuthenticationManagerBuilder auth) throws Exception {
        auth.inMemoryAuthentication().withUser("user").password("1234").roles("ADMIN");
        auth.inMemoryAuthentication().withUser("tom").password("abc123").roles("USER");
    }
     
    @Override
    protected void configure(HttpSecurity http) throws Exception {
  
      http.csrf().disable()
        .authorizeRequests()
        .antMatchers("/user/**").hasRole("ADMIN")
        .and().httpBasic().realmName(REALM).authenticationEntryPoint(getBasicAuthEntryPoint())
        .and().sessionManagement().sessionCreationPolicy(SessionCreationPolicy.STATELESS);//We don't need sessions to be created.
    }
     
    @Bean
    public CustomBasicAuthenticationEntryPoint getBasicAuthEntryPoint(){
        return new CustomBasicAuthenticationEntryPoint();
    }
     
    /* To allow Pre-flight [OPTIONS] request from browser */
    @Override
    public void configure(WebSecurity web) throws Exception {
        web.ignoring().antMatchers(HttpMethod.OPTIONS, "/**");
    }
}

The previous class contains the roles and users that will be necessary to access the app. The annotation @ComponentScan(basePackages = "com.hjbello") tells spring where to look for the rest controllers.

In order to configure the servlets (without the usual web.xml), we will need the following class:

/spring-rest-security-webcam/src/main/java/com/hjbello/CaptureImageInitializer.java
package com.hjbello;

import org.springframework.web.servlet.support.AbstractAnnotationConfigDispatcherServletInitializer;

public class CaptureImageInitializer extends AbstractAnnotationConfigDispatcherServletInitializer {
 
    @Override
    protected Class<?>[] getRootConfigClasses() {
        return new Class[] { CaptureImageConfiguration.class };
    }
  
    @Override
    protected Class<?>[] getServletConfigClasses() {
        return null;
    }
  
    @Override
    protected String[] getServletMappings() {
        return new String[] { "/" };
    }
 
}

Apart from the previous class (if we want to avoid using a file web.xml), the following dependencies shall be added in the pom.xml file:


<dependency>
 <groupId>org.springframework</groupId>
 <artifactId>spring-web</artifactId>
 <version>${org.springframework.version}</version>
</dependency>

<dependency>
 <groupId>javax.servlet</groupId>
 <artifactId>javax.servlet-api</artifactId>
 <version>${javax.servlet-api.version}</version>
 <scope>provided</scope>
</dependency>


Spring security also needs a class that specifies the entry point. This class was referenced in the configuration class that we wrote above.

/spring-rest-security-webcam/src/main/java/com/hjbello/security/CustomBasicAuthenticationEntryPoint.java

package com.hjbello.security;

import java.io.IOException;

import javax.servlet.http.HttpServletRequest;
import javax.servlet.http.HttpServletResponse;

import org.springframework.security.core.AuthenticationException;
import org.springframework.security.web.AuthenticationEntryPoint;
import org.springframework.stereotype.Component;
import java.io.IOException;
import java.io.PrintWriter;
 
import javax.servlet.ServletException;
import javax.servlet.http.HttpServletRequest;
import javax.servlet.http.HttpServletResponse;
 
import org.springframework.security.core.AuthenticationException;
import org.springframework.security.web.authentication.www.BasicAuthenticationEntryPoint;
 
public class CustomBasicAuthenticationEntryPoint extends BasicAuthenticationEntryPoint {
 
    @Override
    public void commence(final HttpServletRequest request, 
            final HttpServletResponse response, 
            final AuthenticationException authException) throws IOException, ServletException {
        //Authentication failed, send error response.
        response.setStatus(HttpServletResponse.SC_UNAUTHORIZED);
        response.addHeader("WWW-Authenticate", "Basic realm=" + getRealmName() + "");
         
        PrintWriter writer = response.getWriter();
        writer.println("HTTP Status 401 : " + authException.getMessage());
    }
     
    @Override
    public void afterPropertiesSet() throws Exception {
        setRealmName("MY_TEST_REALM");
        super.afterPropertiesSet();
    }
}


Capturing Movement with the webcam in the server

Our the package com.hjbello.webcam contains the classes that activate the webcam and start detecting movement capturing one photo each time something moves.


 I will not go into detail here, I will just say that the package that these classes use is in this dependency:


<dependency>
 <groupId>com.github.sarxos</groupId>
 <artifactId>webcam-capture</artifactId>
 <version>0.3.10</version>
</dependency>

(see the github repository by Sarxos)


Rest Controller. Post and Get Methods

Before we set up the controller, we need two POJOs, one for the input of the operation and another for the output.

Here is the input (or request):

/spring-rest-security-webcam/src/main/java/com/hjbello/RequestCapture.java
package com.hjbello;

public class RequestCapture {

 int seconds;

 public RequestCapture(int seconds) {
  super();
  this.seconds = seconds;
 }

 public int getSeconds() {
  return seconds;
 }

 public void setSeconds(int seconds) {
  this.seconds = seconds;
 }

 public RequestCapture() {
  super();
  }
 
}


Here is the output:

/spring-rest-security-webcam/src/main/java/com/hjbello/CapturedMovement.java

package com.hjbello;

import java.util.ArrayList;
import java.util.Date;

public class CapturedMovement {

 private String dateOfCapture;

 private ArrayList<String> imagesPath;

 private ArrayList<byte[]> imagesBase64;

 public String getDateOfCapture() {
  return dateOfCapture;
 }

 public void setDateOfCapture(String dateOfCapture) {
  this.dateOfCapture = dateOfCapture;
 }

 public ArrayList<byte[]> getImagesBase64() {
  return imagesBase64;
 }

 public void setImagesBase64(ArrayList<byte[]> imagesBase64) {
  this.imagesBase64 = imagesBase64;
 }

 public CapturedMovement(String dateOfCapture, ArrayList<byte[]> imagesBase64) {
  super();
  this.dateOfCapture = dateOfCapture;
  this.imagesBase64 = imagesBase64;
 }

 public CapturedMovement() {
  super();
 }

 public ArrayList<String> getImagesPath() {
  return imagesPath;
 }

 public void setImagesPath(ArrayList<String> imagesPath) {
  this.imagesPath = imagesPath;
 }
 
}


Basically, in the input we put the number of seconds during which we want the application to detect the movement (in the server). The output will give us a list with the images in base 64 that it has obtained and the date.


Our rest controller will be in the following class:

/spring-rest-security-webcam/src/main/java/com/hjbello/CaptureImageRestController.java
package com.hjbello;

import java.io.IOException;
import java.util.ArrayList;
import java.util.Date;

import org.springframework.http.HttpStatus;
import org.springframework.http.ResponseEntity;
import org.springframework.web.bind.annotation.PathVariable;
import org.springframework.web.bind.annotation.RequestBody;
import org.springframework.web.bind.annotation.RequestMapping;
import org.springframework.web.bind.annotation.RequestMethod;
import org.springframework.web.bind.annotation.RestController;

import com.hjbello.webcam.DetectMotion;
 
 
@RestController
public class CaptureImageRestController {
 
    @RequestMapping("/")
    public String welcome() {//Welcome page, non-rest
        return "Welcome to RestTemplate Example.";
    }
 
    @RequestMapping("/captureStopIn/{seconds}")
    public ResponseEntity<CapturedMovement> captureGet(@PathVariable String seconds) {//REST Endpoint.
     RequestCapture request = new RequestCapture();
     request.setSeconds(Integer.parseInt(seconds));
        
        return capturePost(request);
    }
    
    @RequestMapping(value = "/capture/", method = RequestMethod.POST)
    public ResponseEntity<CapturedMovement> capturePost(@RequestBody RequestCapture request)  {//REST Endpoint.
     int seconds = request.getSeconds();
     Date date = new Date();
     DetectMotion detector = new DetectMotion("" + seconds);
     try {
   detector.record();
  } catch (IOException e) {
   e.printStackTrace();
  }
      ArrayList<String> imagesPath = detector.getListOfObtaiedImages();
      ArrayList<byte[]> imagesBase64 = detector.getListOfObtainedImageBase64(); 
     
     CapturedMovement response = new CapturedMovement();
     response.setImagesPath(imagesPath);
     response.setImagesBase64(imagesBase64);
     response.setDateOfCapture(date.toString());
        return new ResponseEntity<CapturedMovement>(response, HttpStatus.OK);
    }
}


The basic idea of this class is that.


The first method captureGet will take the string seconds from the path /captureStopIn/{seconds} and will use it to invoke the post method, returning the class CapturedMovement with the images.

The second method  capturePost is the one that will invoke the class that captures the images and mount the output class. It will recieve the number of seconds in which it has to detect movement through the class RequestCapture.


Testing the application

Once we have launched the application using spring boot, we start testing with postman


We introduce the user and the password in the tab Authorization


We translate the response into json and we introduce it in the Body tab. We we click send it will take some time, take the photos and give then to us encoded and inside the json response.


Similarly with the Get method:


Download the code here:

https://github.com/HugoJBello/webcam-mvc-controller
https://github.com/HugoJBello/webcam-mvc-controller/tree/master/spring-rest-security-webcam