Labels

Java (10) Spring (10) Spring MVC (6) Web Services (5) Rest (4) Javascript (3) Nodejs (3) Spring Batch (3) Angular (2) Angular2 (2) Angular6 (2) Expressjs (2) Passportjs (2) SOAP (2) SOAPUI (2) Spring Boot (2) AJAX (1) H2 (1) JQuery (1) JUnit (1) Npm (1) Puppeteer (1) Python (1) RaspberryPi (1) Raspbian (1) SQL (1) SQLite (1) Scripts (1) html (1)

Thursday, March 30, 2017

Creating and exporting SOAP mock web services with SOAPUI

Problem

Sometimes you have to test an application that depends on several web services. Imagine that some of those web services fail or change while you are testing your application.
Something like that could difficult your work, that why you may need to fabricate a ad-hoc web service that imitates (in a very simple way) the one that you are invoking.

These fabricated web services are called mock services. Let us see how produce and export one (into a Tomcat Server) using SOAPUI.

1. Create a SOAPUI project from a WSDL

We will use the following wsdl :

http://www.webservicex.com/globalweather.asmx?WSDL

(with the actual .wsdl file the process will be very similar)

So first go to File | New SOAP Project


2. Create a Mock WS from our project


Now once you have the two interfaces, right click on the project and select Generate Mock Service. There you will choose the endpoint and the port. This port will only work for the SOAPUI mock service, if we export the project to a war and deploy it in a tomcat, the port that we will need will be the one in the Tomcat server..


Now we have the mock created. To add mock responses we click on it and start inventing responses using the template that it offers us. For instance I added two dummy ones. This web service will give you only two responses and it will give them to you sequentially (independently from the input)


You can test your own mock ws by clicking on the mock and selecting "start minimized",

it will appear below


and it will listen the endpoint

http://localhost:8088/mockGlobalWeatherSoap

(this endpoint will work only for this step, as I said once we deploy it in a tomcat this will change). You can test it and see how it only gives us the two requests that we gave it:


3. Export the mock Service into a .war file


Click the project with the right button and select Deploy Project as WAR


4. Deploy the .war file into a tomcat server

You can download the last version of Tomcat here

If you open the tomcat main folder, you will find this:

 To deploy a .war file in any tomcat server you can just paste the file inside the webapps folder. Then when you start the Tomcat by executing the file startup.bat (startup.sh if you are in linux) the server will deploy it
Have in mind that to run a tomcat server you will need to have the JAVA_HOME variable set (with java 7 at least if you use Tomcat 8). If you are in a linux machine you will have to change the permissions of the whole bin folder using chmod -R -777 /path-to-bin-folder/.

You should see something like this if everything goes well


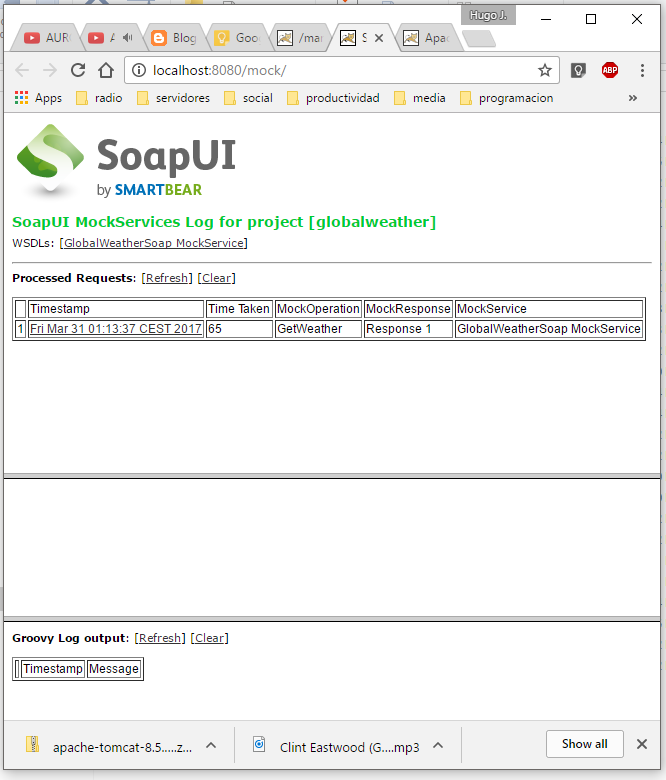
Your server now will be listening to the url:

http://localhost:8080/mock/

and the endpoint (for soap requests)

http://localhost:8080/mock/mockGlobalWeatherSoap

You can see it using a browser:


And you can test it using SOAPUI. As you see it gives us the two dummy responses in sequence:


Using the browser you can see the logs, which is a nice feature.


Monday, March 27, 2017

Taking decisions inside a Spring Batch Flow

Problem

Suppose you have three steps (first step 1 then 2 and finally 3) in a Spring Batch java project. So imagine that you want to start with Step 1, then do some calculations and then decide if you want to skip step 2 or continue normally.

Something like this:


Solution


What you need is to add a tool called decisor that will run between steps 1 and 2. Let us see how.

The first thing we should do is to create the class that will take the decision. This class will implement the following interface:


\src\main\java\com\hjbello\JobExecutionDecider.java

package com.hjbello;

import org.springframework.batch.core.JobExecution;
import org.springframework.batch.core.StepExecution;
import org.springframework.batch.core.job.flow.FlowExecutionStatus;

public interface JobExecutionDecider {

    FlowExecutionStatus decide(JobExecution jobExecution, StepExecution stepExecution);
 
}

This is the class that we will need:

\src\main\java\com\hjbello\FlowDecision.java


package com.hjbello;

import java.util.Random;

import org.apache.commons.logging.Log;
import org.apache.commons.logging.LogFactory;
import org.springframework.batch.core.JobExecution;
import org.springframework.batch.core.StepExecution;
import org.springframework.batch.core.job.flow.FlowExecutionStatus;
import org.springframework.batch.core.job.flow.JobExecutionDecider;
import org.springframework.stereotype.Component;

@Component("decider")
public class FlowDecision implements JobExecutionDecider {
     
    private static final Log log = LogFactory.getLog(NoOpItemReaderStep1.class);
    public static final String COMPLETED = "COMPLETED";
    public static final String FAILED = "FAILED";
    
    public FlowExecutionStatus decide(JobExecution jobExecution, StepExecution stepExecution) {
        Random generator = new Random();
        int randomInt = generator.nextInt();
         
        log.info("Executing Decision with randomInt = " + randomInt);

        if(randomInt % 2 == 0){
         log.info("------------------------------------------");
         log.info("Completed -> go to step 2");
         log.info("------------------------------------------");
            return FlowExecutionStatus.COMPLETED;   
        }
                log.info("------------------------------------------");
                log.info("Failed -> go to step 3");
                log.info("------------------------------------------");
        return FlowExecutionStatus.FAILED;
    }
}


This is a dummy ejemple, what it will do is to obtain a random integer number randomInt;

  • if randomInt is even it will go to step 2 
  • otherwise it will skip step 2 and go to step 3. 
It will actually return a constant (FAILED or COMPLETED) that will be interpreted later inside the flow of the job.

To use this class as a "step" in between 1 and 2 we will have to define our job in the following way. This is the class in which we configure the job

\src\main\java\com\hjbello\BatchConfiguration.java


package com.hjbello;

import javax.batch.api.Decider;
import javax.sql.DataSource;
import org.springframework.batch.core.Job;
import org.springframework.batch.core.Step;
import org.springframework.batch.core.configuration.annotation.EnableBatchProcessing;
import org.springframework.batch.core.configuration.annotation.JobBuilderFactory;
import org.springframework.batch.core.configuration.annotation.StepBuilderFactory;
import org.springframework.batch.core.job.builder.FlowBuilder;
import org.springframework.batch.core.job.flow.Flow;
import org.springframework.batch.core.job.flow.FlowExecutionStatus;
import org.springframework.batch.core.launch.support.RunIdIncrementer;
import org.springframework.beans.factory.annotation.Autowired;
import org.springframework.context.annotation.Bean;
import org.springframework.context.annotation.Configuration;

@Configuration
@EnableBatchProcessing
public class BatchConfiguration {

 @Autowired
 public JobBuilderFactory jobBuilderFactory;

 @Autowired
 public StepBuilderFactory stepBuilderFactory;

 @Autowired
 public DataSource dataSource;

 @Bean
 public Job importJob(JobBuilderFactory jobs) {
  FlowBuilder<Flow> flowBuilder = new FlowBuilder<Flow>("flow1");

  Flow flow =  flowBuilder
    .start(step1())
    .next(decision())
    .on(decision().COMPLETED)
    .to(step2())
    .from(decision())
    .on(decision().FAILED)
    .to(step3())
    .end();

  return jobs.get("importUserLoopJob")
    .incrementer(new RunIdIncrementer())
    .start(flow)
    .end()
    .build();
 }

 // STEPS -----------------------------------------

 public Step step1() {
  return stepBuilderFactory.get("step1")
    .<String, String> chunk(10)
    .reader(readerStep1())
    .writer(writerStep1())
    .build();
 } 


 @Bean
 public Step step2() {
  return stepBuilderFactory.get("step2")
    .<String, String> chunk(10)
    .reader(readerStep2())
    .writer(writerStep2())
    .build();
 }

 @Bean
 public Step step3() {
  return stepBuilderFactory.get("step3")
    .tasklet(tasklet())
    .build();
 }

 // TASKLETS READERS AND WRITERS -------------------

 @Bean
 public NoOpItemReaderStep2 readerStep2(){
  return new NoOpItemReaderStep2(); 
 }

 @Bean
 public NoOpItemReaderStep1 readerStep1(){
  return new NoOpItemReaderStep1(); 
 }

 @Bean
 public NoOpItemWriterStep2 writerStep2(){
  return new NoOpItemWriterStep2(); 
 }

 @Bean
 public NoOpItemWriterStep1 writerStep1(){
  return new NoOpItemWriterStep1(); 
 }

 @Bean
 public TaskletStep3 tasklet(){
  return new TaskletStep3();
 }
 @Bean
 public FlowDecision decision(){
  return new FlowDecision();
 }

}


If we want to do this with xml style instead of full-java configuration we would have to use a module-context.xml file like this one:


<?xml version="1.0" encoding="UTF-8"?>
<beans xmlns="http://www.springframework.org/schema/beans"
 xmlns:xsi="http://www.w3.org/2001/XMLSchema-instance" xmlns:batch="http://www.springframework.org/schema/batch"
 xsi:schemaLocation="
 http://www.springframework.org/schema/batch http://www.springframework.org/schema/batch/spring-batch-2.1.xsd
 http://www.springframework.org/schema/beans http://www.springframework.org/schema/beans/spring-beans-3.0.xsd">

 <description>Example job to get you started. It provides a skeleton for
  a typical batch application.</description>

 <batch:job id="job1">
  <batch:step id="step1" next="decision">
   <batch:tasklet transaction-manager="transactionManager"
    start-limit="100">
    <batch:chunk reader="readerStep1" writer="writerStep1"
     commit-interval="1" />
   </batch:tasklet>
  </batch:step>
  <batch:decision id="decision" decider="decider">
   <batch:next on="FAILED" to="step3" />
   <batch:next on="COMPLETED" to="step2" />
  </batch:decision>
  <batch:step id="step2" next="step3">
   <batch:tasklet transaction-manager="transactionManager"
    start-limit="100">
    <batch:chunk reader="readerStep2" writer="writerStep2"
     commit-interval="1" />
   </batch:tasklet>
  </batch:step>
  <batch:step id="step3">
   <batch:tasklet ref="taskletStep3" transaction-manager="transactionManager"
    start-limit="100">
   </batch:tasklet>
  </batch:step>
 </batch:job>


</beans>


Lets see how it runs:

  • It starts with step 1:


  • Since the number is even commands the flow to go to step 2


  • Starts step 2


  • Ends with step 3.


Download the code here:


Sunday, March 26, 2017

Full java Spring Batch project (no XML)

Translate xml configuration into java configuration


Traditionally, Spring Batch projects contain several xml files in which we configure the beans on the one hand and the steps and jobs on the other hand. Along the years newer versions of spring introduced more and more annotations that allow us to define Spring Batch projects without a single xml file in them (a part form the pom.xml file of course).

In a previous article I described how to pass parameters from one step to another inside a Spring Batch job (see here). Now I will explain how to construct the same Spring Batch project using no xml files and spring Boot to launch it.

Structure of the project


This is the structure of the project that we built here with xml:


 And this is the structure of the project that we will build in which we will only use annotations:


 As you see, instead of all those subfolders, xml files and properties files in src/main/resources, we will only need one configuration file in the new project: BatchConfiguration.java

As a side note, to obtain the basic folder structure for a Spring Batch project with spring Boot and annotation files instead of xml, we can go to File -> new -> New Spring Starter Project and select Batch:


An important difference in the new project is the pom.xml, which will in this case will contain the dependencies corresponding to spring boot and the spring boot plugin


<?xml version="1.0" encoding="UTF-8"?>
<project xmlns="http://maven.apache.org/POM/4.0.0" xmlns:xsi="http://www.w3.org/2001/XMLSchema-instance"
    xsi:schemaLocation="http://maven.apache.org/POM/4.0.0 http://maven.apache.org/xsd/maven-4.0.0.xsd">
    <modelVersion>4.0.0</modelVersion>

    <groupId>com.hjbello</groupId>
    <artifactId>hjbello</artifactId>
    <version>0.1.0</version>

    <parent>
        <groupId>org.springframework.boot</groupId>
        <artifactId>spring-boot-starter-parent</artifactId>
        <version>1.5.2.RELEASE</version>
    </parent>
    
    <properties>
        <java.version>1.8</java.version>
    </properties>

    <dependencies>
        <dependency>
            <groupId>org.springframework.boot</groupId>
            <artifactId>spring-boot-starter-batch</artifactId>
        </dependency>
        <dependency>
            <groupId>org.hsqldb</groupId>
            <artifactId>hsqldb</artifactId>
        </dependency>
    </dependencies>

    <build>
        <plugins>
            <plugin>
                <groupId>org.springframework.boot</groupId>
                <artifactId>spring-boot-maven-plugin</artifactId>
            </plugin>
        </plugins>
    </build>

</project>


From module-context.xml to BatchConfiguration.java

The file module-context.xml contained all the jobs and steps of the project (in this case we have three steps and one job). Here is how it was defined:

/src/main/resources/META-INF/spring/module-context.xml

<?xml version="1.0" encoding="UTF-8"?>
<beans xmlns="http://www.springframework.org/schema/beans"
 xmlns:xsi="http://www.w3.org/2001/XMLSchema-instance" xmlns:batch="http://www.springframework.org/schema/batch"
 xsi:schemaLocation="
 http://www.springframework.org/schema/batch http://www.springframework.org/schema/batch/spring-batch-2.1.xsd
 http://www.springframework.org/schema/beans http://www.springframework.org/schema/beans/spring-beans-3.0.xsd">

 <description> 
 </description>

 <batch:job id="job1">
  <batch:step id="step1" next="step2">
   <batch:tasklet ref="taskletStep1" transaction-manager="transactionManager"
    start-limit="100">
   </batch:tasklet>
  </batch:step>
  <batch:step id="step2" next="step3">
   <batch:tasklet transaction-manager="transactionManager"
    start-limit="100">
    <batch:chunk reader="readerStep2" writer="writerStep2"
     commit-interval="1" />
   </batch:tasklet>
  </batch:step>
  <batch:step id="step3">
   <batch:tasklet transaction-manager="transactionManager"
    start-limit="100">
    <batch:chunk reader="readerStep3" writer="writerStep3"
     commit-interval="1" />
   </batch:tasklet>
  </batch:step>
 </batch:job>
</beans>


Now, all this along with the whole resources folder will vanish. Instead this is what we will have:


/src/main/java/com/hjbello/BatchConfiguration.java


package com.hjbello;

import javax.sql.DataSource;
import org.springframework.batch.core.Job;
import org.springframework.batch.core.Step;
import org.springframework.batch.core.configuration.annotation.EnableBatchProcessing;
import org.springframework.batch.core.configuration.annotation.JobBuilderFactory;
import org.springframework.batch.core.configuration.annotation.StepBuilderFactory;
import org.springframework.beans.factory.annotation.Autowired;
import org.springframework.context.annotation.Bean;
import org.springframework.context.annotation.Configuration;

@Configuration
@EnableBatchProcessing
public class BatchConfiguration {

    @Autowired
    public JobBuilderFactory jobBuilderFactory;

    @Autowired
    public StepBuilderFactory stepBuilderFactory;

    @Autowired
    public DataSource dataSource;

    @Bean
    public Job importUserJob() {
        return jobBuilderFactory.get("importUserJob")
                .start(step1()).next(step2()).next(step3())
                .build();
    }

    // STEPS -----------------------------------------
    @Bean
    public Step step1() {
        return stepBuilderFactory.get("step1")
         .tasklet(tasklet())
                .build();
    }
    
    @Bean
    public Step step2() {
        return stepBuilderFactory.get("step2")
          .<String, String> chunk(10)
                .reader(readerStep2())
                .writer(writerStep2())
                .build();
    }
    public Step step3() {
        return stepBuilderFactory.get("step3")
          .<String, String> chunk(10)
                .reader(readerStep3())
                .writer(writerStep3())
                .build();
    }
    
    // TASKLETS READERS AND WRITERS -------------------
    @Bean
    public TaskletStep1 tasklet(){
     return new TaskletStep1();
    }
   
    @Bean
    public NoOpItemReaderStep2 readerStep2(){
    return new NoOpItemReaderStep2(); 
    }
    
    @Bean
    public NoOpItemReaderStep3 readerStep3(){
    return new NoOpItemReaderStep3(); 
    }
    
    @Bean
    public NoOpItemWriterStep2 writerStep2(){
    return new NoOpItemWriterStep2(); 
    }

    @Bean
    public NoOpItemWriterStep3 writerStep3(){
    return new NoOpItemWriterStep3(); 
    }
}

Lets break it down:

To configure the steps we use just define the classes (readers, writers and tasklets) as beans in the usual way using @Bean annotation. Then we define a bean that belongs to the Step class in which we return a step using StepBuilderFactory with the adequate attributes.


  •  If our step is a typical reader-writer (-processor) one we use something like

    @Bean
    public Step step2() {
        return stepBuilderFactory.get("step2")
          .<String, String> chunk(10)
                .reader(readerStep2())
                .writer(writerStep2())
                .build();
    }

  • If the step contains a tasklet, we use:


    @Bean
    public Step step1() {
        return stepBuilderFactory.get("step1")
         .tasklet(tasklet())
                .build();
    }


Then to configure the job and tie the steps together we use:


    @Bean
    public Job importJob() {
        return jobBuilderFactory.get("importUserJob")
                .start(step1()).next(step2()).next(step3())
                .build();
    }


I will not include the code of the tasklets readers and writers because they are de same as the ones in the example of the previous tutorial. You can take a look at the code here:

https://github.com/HugoJBello/java-projects-tutorials/tree/master/spring-batch-passing-parameters-annotations/src/main/java/com/hjbello

Launch the application using Spring Boot

The last difference is that in order to run the application, in our case we will need a simple static void main method inside a class SpringBatchApplication.java


package com.hjbello;

import org.springframework.boot.SpringApplication;
import org.springframework.boot.autoconfigure.SpringBootApplication;

@SpringBootApplication
public class SpringBatchApplication {

 public static void main(String[] args) {
  SpringApplication.run(SpringBatchApplication.class, args);
 }
}


Now run this class to run the app.


Download the code here:


Friday, March 24, 2017

Passing parameters to future steps in Spring Batch

The problem

Imagine that you have a simple spring batch project composed by a job with three steps:


<batch:job id="job1">
  <batch:step id="step1" next="step2">
   <batch:tasklet ref="taskletStep1" transaction-manager="transactionManager"
    start-limit="100">
   </batch:tasklet>
  </batch:step>
  <batch:step id="step2" next="step3">
   <batch:tasklet transaction-manager="transactionManager"
    start-limit="100">
    <batch:chunk reader="readerStep2" writer="writerStep2"
     commit-interval="1" />
   </batch:tasklet>
  </batch:step>
  <batch:step id="step3">
   <batch:tasklet transaction-manager="transactionManager"
    start-limit="100">
    <batch:chunk reader="readerStep3" writer="writerStep3"
     commit-interval="1" />
   </batch:tasklet>
  </batch:step>
 </batch:job>

In many cases steps in Spring Batch tend to be independent processes that do not often communicate with each other. But What if we want to pass an object from step 1 to step 2 or 3?

This is a problem that I encountered in the past and that made me struggle a lot.

Solution

Suppose that you want to pass a String someStringToPass from Step 1, which is composed of a simple tasklet taskletStep1. Then what you need to do is to store this parameter in the so called job context.

You can achieve that by invoking the object ChuckContext which is an input the method RepeatStatus of the interface Tasket that we are implementing in our TaskletStep1. Particularly you will need a sentence like this:


chunkContext.getStepContext().getStepExecution().getJobExecution().getExecutionContext().put("someStringToPass", someStringToPass);


In case you need more context, here you have the complete code of an exampe of tasket in which we do this process.


package com.batch.steps;

import java.util.Random;

import org.apache.commons.logging.Log;
import org.apache.commons.logging.LogFactory;
import org.springframework.batch.core.StepContribution;
import org.springframework.batch.core.StepExecution;
import org.springframework.batch.core.annotation.BeforeStep;
import org.springframework.batch.core.scope.context.ChunkContext;
import org.springframework.batch.core.step.tasklet.Tasklet;
import org.springframework.batch.item.ExecutionContext;
import org.springframework.batch.repeat.RepeatStatus;
import org.springframework.stereotype.Component;

@Component("taskletStep1")
public class TaskletStep1 implements Tasklet{
 
 private static final Log log = LogFactory.getLog(TaskletStep1.class);
    
    private String someStringToPass="";
    Random generator = new Random();
    int randomInt = generator.nextInt();
    @Override
    public RepeatStatus execute(StepContribution contribution,
            ChunkContext chunkContext) throws Exception {
     log.info("------------------------------------------");
  log.info("Inside step 1");
        
   someStringToPass = "" + randomInt;
   
   //Here is where we storage the parameter in to the context for future steps:
  chunkContext.getStepContext().getStepExecution().getJobExecution().getExecutionContext().put("someStringToPass", someStringToPass);
  
  log.info("Passing " + someStringToPass + " to next steps");
  log.info("------------------------------------------");

        return RepeatStatus.FINISHED;
    }
    
     
}


Now someStringToPass is in this "jobContext", so How we invoke it in other steps?


1
. The class in which we invoke it must have the annotation (before public class ...)


@Scope("step")

2. Declare the object that we want to use as a container of the parameter like this:


@Value("#{jobExecutionContext['someStringToPass']}")
private String someStringFromPrevStep;

or alternatively use declare it without the @Value annotation and then include a method like this one:


@BeforeStep                                                                      
  public void retrieveInterstepData(StepExecution stepExecution) {               
      JobExecution jobExecution = stepExecution.getJobExecution();               
      ExecutionContext jobContext = jobExecution.getExecutionContext();          
      this.someStringFromPrevStep = (String) jobContext.get("someStringToPass"); 

Here you have an example of a dummy writer in which we invoke the parameter from a Step1 (where tasket1 is):


package com.batch.steps;

import org.apache.commons.logging.Log;
import org.apache.commons.logging.LogFactory;
import org.springframework.batch.core.JobExecution;
import org.springframework.batch.core.StepExecution;
import org.springframework.batch.core.annotation.BeforeStep;
import org.springframework.batch.item.ExecutionContext;
import org.springframework.batch.item.ItemReader;
import org.springframework.beans.factory.annotation.Value;
import org.springframework.context.annotation.Scope;
import org.springframework.stereotype.Component;

/**
 * {@link ItemReader} with hard-coded input data.
 */

@Component("readerStep3")
@Scope("step")
public class NoOpItemReaderStep3 implements ItemReader<String> {
 
 private static final Log log = LogFactory.getLog(NoOpItemReaderStep3.class);
 
 @Value("#{jobExecutionContext['someStringToPass']}")
 private String someStringFromPrevStep;
 
 private int index = 0;
 
 /**
  * Reads next record from input
  */
 public String read() throws Exception {
  if (index < 1) {
   log.info("------------------------------------------");
   log.info("Inside step 3");
   log.info("This string is from step 1: "+ someStringFromPrevStep);
   log.info("------------------------------------------");

    index++;
   return "done";
   }
  else {
   return null;
  }
  
 }
// @BeforeStep
//    public void retrieveInterstepData(StepExecution stepExecution) {
//        JobExecution jobExecution = stepExecution.getJobExecution();
//        ExecutionContext jobContext = jobExecution.getExecutionContext();
//        this.someStringFromPrevStep = (String) jobContext.get("someStringToPass");
//    }

}


Here are the logs that prove that Spring took the parameter from one step to the other:


Download the code here: