Translate xml configuration into java configuration
Traditionally, Spring Batch projects contain several xml files in which we configure the beans on the one hand and the steps and jobs on the other hand. Along the years newer versions of spring introduced more and more annotations that allow us to define Spring Batch projects without a single xml file in them (a part form the pom.xml file of course).
In a previous article I described how to pass parameters from one step to another inside a Spring Batch job (see here). Now I will explain how to construct the same Spring Batch project using no xml files and spring Boot to launch it.
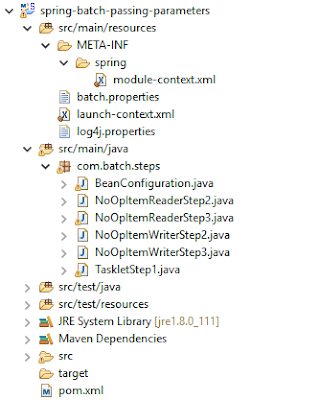
Structure of the project
This is the structure of the project that we built here with xml:
As a side note, to obtain the basic folder structure for a Spring Batch project with spring Boot and annotation files instead of xml, we can go to File -> new -> New Spring Starter Project and select Batch:
An important difference in the new project is the pom.xml, which will in this case will contain the dependencies corresponding to spring boot and the spring boot plugin
<?xml version="1.0" encoding="UTF-8"?>
<project xmlns="http://maven.apache.org/POM/4.0.0" xmlns:xsi="http://www.w3.org/2001/XMLSchema-instance"
    xsi:schemaLocation="http://maven.apache.org/POM/4.0.0 http://maven.apache.org/xsd/maven-4.0.0.xsd">
    <modelVersion>4.0.0</modelVersion>

    <groupId>com.hjbello</groupId>
    <artifactId>hjbello</artifactId>
    <version>0.1.0</version>

    <parent>
        <groupId>org.springframework.boot</groupId>
        <artifactId>spring-boot-starter-parent</artifactId>
        <version>1.5.2.RELEASE</version>
    </parent>

    <properties>
        <java.version>1.8</java.version>
    </properties>

    <dependencies>
        <dependency>
            <groupId>org.springframework.boot</groupId>
            <artifactId>spring-boot-starter-batch</artifactId>
        </dependency>
        <dependency>
            <groupId>org.hsqldb</groupId>
            <artifactId>hsqldb</artifactId>
        </dependency>
    </dependencies>

    <build>
        <plugins>
            <plugin>
                <groupId>org.springframework.boot</groupId>
                <artifactId>spring-boot-maven-plugin</artifactId>
            </plugin>
        </plugins>
    </build>

</project>
From module-context.xml to BatchConfiguration.java
The file module-context.xml contained all the jobs and steps of the project (in this case we have three steps and one job). Here is how it was defined:
/src/main/resources/META-INF/spring/module-context.xml
Now, all this along with the whole resources folder will vanish. Instead this is what we will have:
/src/main/java/com/hjbello/BatchConfiguration.java
Lets break it down:
To configure the steps we use just define the classes (readers, writers and tasklets) as beans in the usual way using @Bean annotation. Then we define a bean that belongs to the Step class in which we return a step using StepBuilderFactory with the adequate attributes.
/src/main/resources/META-INF/spring/module-context.xml
<?xml version="1.0" encoding="UTF-8"?>
<beans xmlns="http://www.springframework.org/schema/beans"
 xmlns:xsi="http://www.w3.org/2001/XMLSchema-instance" xmlns:batch="http://www.springframework.org/schema/batch"
 xsi:schemaLocation="
 http://www.springframework.org/schema/batch http://www.springframework.org/schema/batch/spring-batch-2.1.xsd
 http://www.springframework.org/schema/beans http://www.springframework.org/schema/beans/spring-beans-3.0.xsd">

 <description>
 </description>

 <batch:job id="job1">
  <batch:step id="step1" next="step2">
   <batch:tasklet ref="taskletStep1" transaction-manager="transactionManager"
    start-limit="100">
   </batch:tasklet>
  </batch:step>
  <batch:step id="step2" next="step3">
   <batch:tasklet transaction-manager="transactionManager"
    start-limit="100">
    <batch:chunk reader="readerStep2" writer="writerStep2"
     commit-interval="1" />
   </batch:tasklet>
  </batch:step>
  <batch:step id="step3">
   <batch:tasklet transaction-manager="transactionManager"
    start-limit="100">
    <batch:chunk reader="readerStep3" writer="writerStep3"
     commit-interval="1" />
   </batch:tasklet>
  </batch:step>
 </batch:job>
</beans>
Now, all this along with the whole resources folder will vanish. Instead this is what we will have:
/src/main/java/com/hjbello/BatchConfiguration.java
package com.hjbello;

import javax.sql.DataSource;
import org.springframework.batch.core.Job;
import org.springframework.batch.core.Step;
import org.springframework.batch.core.configuration.annotation.EnableBatchProcessing;
import org.springframework.batch.core.configuration.annotation.JobBuilderFactory;
import org.springframework.batch.core.configuration.annotation.StepBuilderFactory;
import org.springframework.beans.factory.annotation.Autowired;
import org.springframework.context.annotation.Bean;
import org.springframework.context.annotation.Configuration;

@Configuration
@EnableBatchProcessing
public class BatchConfiguration {

    @Autowired
    public JobBuilderFactory jobBuilderFactory;

    @Autowired
    public StepBuilderFactory stepBuilderFactory;

    @Autowired
    public DataSource dataSource;

    @Bean
    public Job importUserJob() {
        return jobBuilderFactory.get("importUserJob")
                .start(step1()).next(step2()).next(step3())
                .build();
    }

    // STEPS -----------------------------------------
    @Bean
    public Step step1() {
        return stepBuilderFactory.get("step1")
         .tasklet(tasklet())
                .build();
    }

    @Bean
    public Step step2() {
        return stepBuilderFactory.get("step2")
          .<String, String> chunk(10)
                .reader(readerStep2())
                .writer(writerStep2())
                .build();
    }
    public Step step3() {
        return stepBuilderFactory.get("step3")
          .<String, String> chunk(10)
                .reader(readerStep3())
                .writer(writerStep3())
                .build();
    }

    // TASKLETS READERS AND WRITERS -------------------
    @Bean
    public TaskletStep1 tasklet(){
     return new TaskletStep1();
    }

    @Bean
    public NoOpItemReaderStep2 readerStep2(){
    return new NoOpItemReaderStep2();
    }

    @Bean
    public NoOpItemReaderStep3 readerStep3(){
    return new NoOpItemReaderStep3();
    }

    @Bean
    public NoOpItemWriterStep2 writerStep2(){
    return new NoOpItemWriterStep2();
    }

    @Bean
    public NoOpItemWriterStep3 writerStep3(){
    return new NoOpItemWriterStep3();
    }
}
Lets break it down:
To configure the steps we use just define the classes (readers, writers and tasklets) as beans in the usual way using @Bean annotation. Then we define a bean that belongs to the Step class in which we return a step using StepBuilderFactory with the adequate attributes.
- If our step is a typical reader-writer (-processor) one we use something like
    @Bean
    public Step step2() {
        return stepBuilderFactory.get("step2")
          .<String, String> chunk(10)
                .reader(readerStep2())
                .writer(writerStep2())
                .build();
    }
- If the step contains a tasklet, we use:
    @Bean
    public Step step1() {
        return stepBuilderFactory.get("step1")
         .tasklet(tasklet())
                .build();
    }
Then to configure the job and tie the steps together we use:
I will not include the code of the tasklets readers and writers because they are de same as the ones in the example of the previous tutorial. You can take a look at the code here:
https://github.com/HugoJBello/java-projects-tutorials/tree/master/spring-batch-passing-parameters-annotations/src/main/java/com/hjbello
    @Bean
    public Job importJob() {
        return jobBuilderFactory.get("importUserJob")
                .start(step1()).next(step2()).next(step3())
                .build();
    }
I will not include the code of the tasklets readers and writers because they are de same as the ones in the example of the previous tutorial. You can take a look at the code here:
https://github.com/HugoJBello/java-projects-tutorials/tree/master/spring-batch-passing-parameters-annotations/src/main/java/com/hjbello
Launch the application using Spring Boot
The last difference is that in order to run the application, in our case we will need a simple static void main method inside a class SpringBatchApplication.javapackage com.hjbello; import org.springframework.boot.SpringApplication; import org.springframework.boot.autoconfigure.SpringBootApplication; @SpringBootApplication public class SpringBatchApplication { public static void main(String[] args) { SpringApplication.run(SpringBatchApplication.class, args); } }


No comments:
Post a Comment