Spring Security and H2
Most of Spring Security examples cover how to build a login page for your project in which users and passwords are retrieved for a MySQL database. I have not found examples of how to do this same task with an H2 database.
What we will see in this tutorial is how to build a spring MVC project that allows every user access to the home page but every time you try to access any other page it redirects you to the login page and forces you to authenticate.

The user and password will be inside a table in a H2 database that we will construct. This will be an in-memory database, which means that it is actually a .db file. Furthermore, from our MVC application we will have access to an console in which we will be able to administrate the DB easily.

How to build it
Configuration classes
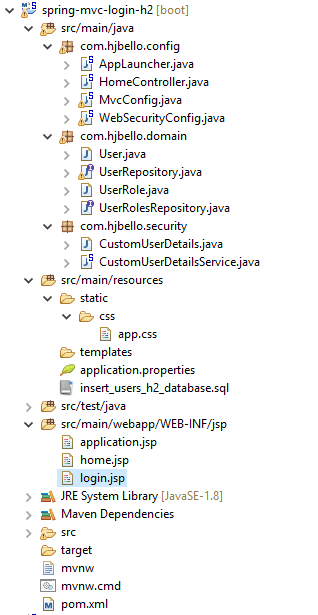
I created the project from 0 using Spring Starter (File -> New -> Spring Starter Project) by selecting a simple web project.This is the structure of the project:
The first thing that we will need will be the maven dependencies. Here is our pom.xml
<?xml version="1.0" encoding="UTF-8"?>
<project xmlns="http://maven.apache.org/POM/4.0.0" xmlns:xsi="http://www.w3.org/2001/XMLSchema-instance"
 xsi:schemaLocation="http://maven.apache.org/POM/4.0.0 http://maven.apache.org/xsd/maven-4.0.0.xsd">
 <modelVersion>4.0.0</modelVersion>

 <groupId>com.hjbello</groupId>
 <artifactId>hjbello</artifactId>
 <version>0.0.1-SNAPSHOT</version>
 <packaging>jar</packaging>

 <name>spring-mvc-login-h2</name>
 <description> </description>

 <parent>
  <groupId>org.springframework.boot</groupId>
  <artifactId>spring-boot-starter-parent</artifactId>
  <version>1.5.6.RELEASE</version>
  <relativePath/>
 </parent>

 <properties>
  <project.build.sourceEncoding>UTF-8</project.build.sourceEncoding>
  <project.reporting.outputEncoding>UTF-8</project.reporting.outputEncoding>
  <java.version>1.8</java.version>
 </properties>

 <dependencies>
  <dependency>
   <groupId>org.springframework.boot</groupId>
   <artifactId>spring-boot-starter-security</artifactId>
  </dependency>

  <dependency>
   <groupId>org.springframework.boot</groupId>
   <artifactId>spring-boot-starter-web</artifactId>
  </dependency>

  <dependency>
   <groupId>org.springframework.boot</groupId>
   <artifactId>spring-boot-starter-test</artifactId>
   <scope>test</scope>
  </dependency>

  <dependency>
   <groupId>org.springframework.security</groupId>
   <artifactId>spring-security-test</artifactId>
   <scope>test</scope>
  </dependency>

  <dependency>
   <groupId>org.springframework.security</groupId>
   <artifactId>spring-security-web</artifactId>
   </dependency>

   <dependency>
   <groupId>org.springframework.security</groupId>
   <artifactId>spring-security-config</artifactId>
  </dependency>
  <!--Apache tomcat, this allow us to work with jsp files  -->
  <dependency>
   <groupId>org.apache.tomcat.embed</groupId>
   <artifactId>tomcat-embed-jasper</artifactId>
   <scope>provided</scope>
  </dependency>

  <dependency>
   <groupId>javax.servlet</groupId>
   <artifactId>jstl</artifactId>
   <exclusions>
    <exclusion>
     <groupId>javax.servlet</groupId>
     <artifactId>servlet-api</artifactId>
    </exclusion>
   </exclusions>
  </dependency>

  <!-- h2 database -->
        <dependency>
            <groupId>org.springframework.boot</groupId>
            <artifactId>spring-boot-starter-data-jpa</artifactId>
        </dependency>

  <dependency>
   <groupId>com.h2database</groupId>
   <artifactId>h2</artifactId>
   <scope>runtime</scope>
  </dependency>
 </dependencies>
 <build>
  <plugins>
   <plugin>
    <groupId>org.springframework.boot</groupId>
    <artifactId>spring-boot-maven-plugin</artifactId>
   </plugin>
  </plugins>
 </build>
</project>
In the class MvcConfig we will configure the basic MVC settings:
\src\main\java\com\hjbello\config\MvcConfig.java
\src\main\java\com\hjbello\config\MvcConfig.java
package com.hjbello.config;

import org.h2.server.web.WebServlet;
import org.slf4j.Logger;
import org.slf4j.LoggerFactory;
import org.springframework.boot.web.servlet.ServletRegistrationBean;
import org.springframework.context.annotation.Bean;
import org.springframework.context.annotation.ComponentScan;
import org.springframework.context.annotation.Configuration;
import org.springframework.web.servlet.config.annotation.EnableWebMvc;
import org.springframework.web.servlet.config.annotation.ResourceHandlerRegistry;
import org.springframework.web.servlet.config.annotation.WebMvcConfigurerAdapter;
import org.springframework.web.servlet.view.InternalResourceViewResolver;

@Configuration
@EnableWebMvc
@ComponentScan(basePackages = "com")
public class MvcConfig extends WebMvcConfigurerAdapter{

 @Override
 public void addResourceHandlers(ResourceHandlerRegistry registry) {
   if (!registry.hasMappingForPattern("/css/**")) {
      registry.addResourceHandler("/css/**").addResourceLocations("classpath:/static/css/");
   }
 }

 @Bean
 public InternalResourceViewResolver viewResolver() {
  InternalResourceViewResolver resolver = new InternalResourceViewResolver();
  resolver.setPrefix("/WEB-INF/jsp/");
  resolver.setSuffix(".jsp");
  return resolver;
 }

    @Bean
    ServletRegistrationBean h2servletRegistration(){
        ServletRegistrationBean registrationBean = new ServletRegistrationBean( new WebServlet());
        registrationBean.addUrlMappings("/console/*");
        return registrationBean;
    }
}
The last bean h2servletRegistration is behind the magic H2 console that we will access in localhost:8080/console once the server is started.
The configuration of Spring security will be managed by the following class
/src/main/java/com/hjbello/config/WebSecurityConfig.java
/src/main/java/com/hjbello/config/WebSecurityConfig.java
package com.hjbello.config;

import org.springframework.beans.factory.annotation.Autowired;
import org.springframework.boot.autoconfigure.domain.EntityScan;
import org.springframework.context.annotation.Bean;
import org.springframework.context.annotation.ComponentScan;
import org.springframework.context.annotation.Configuration;
import org.springframework.context.annotation.EnableAspectJAutoProxy;
import org.springframework.security.config.annotation.authentication.builders.AuthenticationManagerBuilder;
import org.springframework.security.config.annotation.method.configuration.EnableGlobalMethodSecurity;
import org.springframework.security.config.annotation.web.builders.HttpSecurity;
import org.springframework.security.config.annotation.web.configuration.WebSecurityConfigurerAdapter;
import org.springframework.security.config.annotation.web.servlet.configuration.EnableWebMvcSecurity;
import org.springframework.security.core.userdetails.UserDetailsService;
import org.springframework.security.crypto.bcrypt.BCryptPasswordEncoder;
import org.springframework.security.crypto.password.PasswordEncoder;
import org.springframework.transaction.annotation.EnableTransactionManagement;

import com.hjbello.security.CustomUserDetailsService;

@Configuration
@EnableWebMvcSecurity
@EnableGlobalMethodSecurity(securedEnabled = true)
@ComponentScan(basePackageClasses = CustomUserDetailsService.class)
@EnableTransactionManagement
@EntityScan( basePackages = {"com"} )
@EnableAspectJAutoProxy(proxyTargetClass = true)
public class WebSecurityConfig extends WebSecurityConfigurerAdapter {

 @Autowired
 private UserDetailsService userDetailsService;

 @Autowired
 public void configAuthentication(AuthenticationManagerBuilder auth) throws Exception {
  auth.userDetailsService(userDetailsService);
 }

 @Override
 protected void configure(HttpSecurity http) throws Exception {
   http.authorizeRequests()
  .antMatchers("/application").access("hasRole('ROLE_ADMIN')")
  .anyRequest().permitAll()
  .and()
    .formLogin().loginPage("/login")
    .usernameParameter("username").passwordParameter("password")
  .and()
    .logout().logoutSuccessUrl("/login?logout")
   .and()
   .exceptionHandling().accessDeniedPage("/403")
  .and()
    .csrf();
   http.headers().frameOptions().disable();
   http.authorizeRequests().antMatchers("/").permitAll().and()
 .authorizeRequests().antMatchers("/console/**").permitAll();

   http.csrf().disable();

 }

 @Bean(name="passwordEncoder")
    public PasswordEncoder passwordencoder(){
     return new BCryptPasswordEncoder();
    }
}
The bean configure tells Spring Security which pages are accessible in function of the different user roles.
Apart from all this, we will need some extra classes to allow Spring Security to retrieve the users and roles. I am referring to this two packages:

Since this is getting too dense, I will not detail these classes so much now. You can find them here. Remember that the whole project is in my github page here.
Finally, we will need a Spring application.properties with the following constants:
(this will be necessary for the configuration of our H2 database)
Apart from all this, we will need some extra classes to allow Spring Security to retrieve the users and roles. I am referring to this two packages:
Since this is getting too dense, I will not detail these classes so much now. You can find them here. Remember that the whole project is in my github page here.
Finally, we will need a Spring application.properties with the following constants:
spring.datasource.url = jdbc:h2:file:~/h2/security_db;DB_CLOSE_ON_EXIT=FALSE
spring.datasource.username = sa
spring.datasource.password =
spring.datasource.driverClassName = org.h2.Driver
spring.jpa.database-platform=org.hibernate.dialect.H2Dialect
spring.jpa.show-sql = true
spring.jpa.hibernate.ddl-auto=update
(this will be necessary for the configuration of our H2 database)
The controller
Now, let us define the controller for the different pages of our application
package com.hjbello.config;

import org.slf4j.Logger;
import org.slf4j.LoggerFactory;
import org.springframework.security.access.annotation.Secured;
import org.springframework.stereotype.Controller;
import org.springframework.ui.Model;
import org.springframework.web.bind.annotation.RequestMapping;
import org.springframework.web.bind.annotation.RequestMethod;

@Controller
public class HomeController {

 private static final Logger logger = LoggerFactory.getLogger(HomeController.class);

 @RequestMapping(value = "/", method = RequestMethod.GET)
 public String home(Model model) {
  logger.info("Accessing home page");
  return "home";
 }

 @RequestMapping(value = "/home", method = RequestMethod.GET)
 public String homePage(Model model) {
  logger.info("Accessing home page");
  return "home";
 }

 @RequestMapping(value = "/login", method = RequestMethod.GET)
 public String login(Model model) {
  logger.info("Accessing login page");
  return "login";
 }

 @RequestMapping(value = "/application", method = RequestMethod.GET)
 @Secured({"ROLE_ADMIN"})
 public String application(Model model) {
  logger.info("Accessing application page");
  return "application";
 }

}
The request mappings are straight forward: only three possible urls: "/", "/home", "/login" and "/application". The two first will redirect us to "home.jsp", the third to "login.jsp" and the last one to "application.jsp". Notice that the annotation @Secured is an alternative way to force a page to be accessible through a particular role.
The views
\src\main\webapp\WEB-INF\jsp\home.jsp
<%@ page language="java" contentType="text/html; charset=UTF-8"
 pageEncoding="UTF-8"%>
<%@ taglib prefix="spring" uri="http://www.springframework.org/tags"%>
<%@ taglib prefix="c" uri="http://java.sun.com/jsp/jstl/core"%>
<!DOCTYPE html>
<html>
<head>
<link href="<spring:url value="css/app.css" context="spring-mvc-security-webcam"/>" rel="stylesheet"
 type="text/css">
<title>Welcome</title>
</head>
<body class="security-app">

 <div class="details">

 </div>
 <div class="text_centered">
  <h1>Welcome!</h1>
  <div class="alert-normal">
   Click <a href="<spring:url value='/application' />">here</a> Enter the application.
  </div>
 </div>
</body>
</html>
<%@ page language="java" contentType="text/html; charset=UTF-8"
 pageEncoding="UTF-8"%>
<%@ taglib prefix="spring" uri="http://www.springframework.org/tags"%>
<%@ taglib prefix="c" uri="http://java.sun.com/jsp/jstl/core"%>
| <html> | |
| <head> | |
| <link href="
type="text/css">
<title>Spring Security Login</title>
</head>
<body class="security-app">
<form action="/login" method="post">
<div class="login">
<div class="login-table">
<div class="row">
<div class="cell">
<label>Username</label>
</div>
<div class="cell">
<input type="text" name="username" placeholder="User Name" />
</div>
</div>
<div class="row">
<div class="cell">
<label>Password</label>
</div>
<div class="cell">
<input type="password" name="password" placeholder="Password" />
</div>
</div>
<div class="row">
<div class="cell">
<input type="submit" value="Sign In"/>
</div>
</div>
</div>
<c:if test="${param.error ne null}">
<div class="alert-danger">Invalid username and password.</div>
</c:if>
<c:if test="${param.logout ne null}">
<div class="alert-normal">You have been logged out.</div>
</c:if>
<input type="hidden" name="${_csrf.parameterName}"
value="${_csrf.token}" />
</div>
</form>
</body>
</html>
|
\src\main\webapp\WEB-INF\jsp\application.jsp
<%@ page language="java" contentType="text/html; charset=UTF-8"
 pageEncoding="UTF-8"%>
<%@ taglib prefix="spring" uri="http://www.springframework.org/tags"%>
<%@ taglib prefix="c" uri="http://java.sun.com/jsp/jstl/core"%>
| <html> | |
| <head> | |
| <link href="
type="text/css">
<title>Application</title>
</head>
<body class="security-app">
<div class="text_centered">
<h1>
Hello <b><c:out value="${pageContext.request.remoteUser}"></c:out></b>
</h1>
<h2>You are inside the application</h2>
<form action="/logout" method="post">
<input type="submit" class="button red big" value="Sign Out" /> <input
type="hidden" name="${_csrf.parameterName}" value="${_csrf.token}" />
</form>
</div>
</body>
</html>
|
Test the application
First, we start he server. If it is the first time that we access our application, we will need to create a new user. We can do that going to the h2 console in http://localhost:8080/console
We will find the following:
We will find the following:

If we put the parameters that we used in the file application.properties we will see:

here we can insert a new user and role in the tables using the SQL commands:
INSERT INTO users(username,password,enabled)
VALUES ('hjbello','1234', true);

INSERT INTO user_roles (userid, role)
VALUES (1, 'ROLE_USER');
INSERT INTO user_roles (userid, role)
VALUES (1, 'ROLE_ADMIN');
Now we can access our application with the user hjbello and password 1234.


Download the code here!
The project is here.
The full github repo is here.


